Fixing Loose or Damaged Ports on Desktop Motherboards
If you’re experiencing issues with the USB or HDMI ports on your desktop motherboard, it’s important to diagnose the root cause of the problem before attempting any repairs. Loose or damaged ports can disrupt the connectivity and functionality of your desktop computer, affecting your overall user experience. In this article, we will explore the steps to repair these ports and restore optimal performance to your desktop motherboard.
Whether you’re dealing with loose ports or damaged ones, it’s crucial to address the issue promptly to avoid further complications. Loose ports can result in unreliable connections and intermittent device recognition, while damaged ports can render a specific port or even the entire motherboard unusable. A related repair case also appears in diagnosing fixing desktop cpu socket, where the same fault patterns can change the best fix path.
To begin the troubleshooting process, it’s important to determine whether the problem lies with the port itself or the device being connected. Test the port with multiple devices to pinpoint the source of the connectivity issue. If the problem persists across different devices, it’s likely that the port requires repair or replacement.
Before attempting any repairs, it is recommended to clean the port to remove any dust or debris that could be obstructing the connection. Use compressed air or a vacuum cleaner to gently clean the port. This simple step can often resolve connectivity issues caused by dirt buildup.
If the port is loose or damaged, repairing it requires specialized knowledge and skills. Depending on the severity of the damage, you may need to replace the port entirely or seek professional assistance. Attempting to repair a motherboard without the necessary expertise can lead to further damage and potentially irreversible consequences.
In the following sections, we will provide detailed guidance on troubleshooting and repairing both USB and HDMI ports on desktop motherboards. While some repairs can be accomplished by experienced individuals, it is essential to exercise caution and consult professionals when needed. By following the appropriate steps and seeking professional assistance when necessary, you can restore the connectivity of your desktop motherboard and ensure optimal performance.
Related:


Troubleshooting USB Port Issues on Desktop Motherboards
Before assuming that your USB port is faulty, it is important to go through a few steps to diagnose the issue. Follow these troubleshooting steps to identify and resolve common USB port problems on desktop motherboards.
Step 1: Test the USB device in another port
If you encounter issues with a specific USB port, try connecting the device to a different USB port on your desktop motherboard. If the device works seamlessly in another port, it indicates that the problem lies with the original port.
Step 2: Inspect for physical damage and dirt buildup
Examine the USB port for any visible signs of physical damage, such as bent pins or broken connectors. Additionally, check for dirt, debris, or lint that may hinder the proper connection between the USB device and the port. Clean the USB port using compressed air or a vacuum cleaner to eliminate any obstructions.
Step 3: Check for loose connections
Ensure that the USB port is securely attached to the motherboard. Sometimes, a loose connection can cause connectivity issues. Gently wiggle the USB port to check if it moves or feels unstable. If it does, it may require tightening or reseating.
Step 4: Verify USB device driver installation
Ensure that the USB device drivers are correctly installed on your system. Outdated or corrupt drivers can lead to USB port malfunctioning. Update the drivers using the latest versions available from the manufacturer’s website or use the Windows Device Manager to automatically search for driver updates.
Step 5: Restart your computer
Sometimes, a simple restart can solve temporary software glitches that affect USB port functionality on desktop motherboards. Restart your computer and check if the USB port starts working properly.
Step 6: Consider professional assistance
If none of the above troubleshooting steps resolve the issue, you may need to seek professional assistance. An experienced technician can perform advanced diagnostics and repairs, such as replacing the USB port or addressing any underlying motherboard issues.
If you follow these steps, you should be able to resolve common USB port issues on your desktop motherboard. However, always remember to exercise caution when handling delicate motherboard components and consider seeking professional help if you are unsure or uncomfortable performing repairs yourself.
Repairing Loose USB Ports on Desktop Motherboards
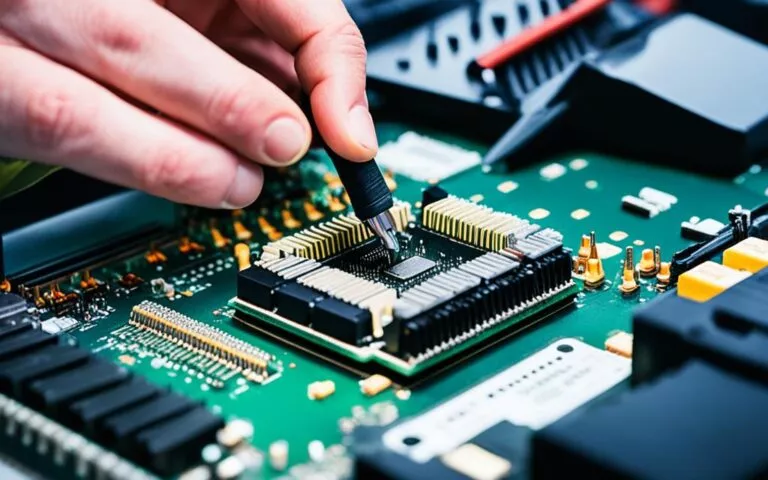
Repairing a loose USB port on a desktop motherboard can be a challenging task. If you’re confident in your soldering skills, you can attempt to re-solder the port to the motherboard. However, this requires careful handling and precise soldering techniques. Alternatively, you can seek the help of a professional who specializes in motherboard repairs.
When repairing a loose USB port, it is essential to have the right tools and equipment. A soldering iron with a fine tip, soldering wire, flux, and desoldering wick or pump are necessary for the repair process. Make sure to take necessary precautions such as wearing safety goggles and working in a well-ventilated area.
Here is a step-by-step guide to repairing a loose USB port:
- Prepare the workspace: Gather all the necessary tools and make sure you have a clean and clutter-free workspace to work on.
- Disassemble your desktop: Before attempting any repairs, ensure that you have unplugged the power and discharged any static electricity from your body. Disassemble your desktop carefully, and locate the motherboard.
- Identify the loose USB port: Inspect the USB ports on the motherboard and identify the one that is loose or causing connectivity issues.
- Apply flux: Apply a small amount of flux to the pins of the USB port. Flux helps improve the flow of solder and makes it easier to remove the existing solder.
- Remove the existing solder: Use a desoldering pump or wick to remove the existing solder from the pins of the USB port. Be gentle and avoid applying excessive force to prevent damage to the motherboard.
- Reposition the USB port: Carefully reposition the USB port to align it with the motherboard’s solder pads. Ensure that all the pins of the port fit securely into their respective holes.
- Solder the USB port: Heat up your soldering iron and carefully solder each pin of the USB port to the motherboard’s solder pads. Apply a small amount of solder to create a secure and reliable connection. Avoid overheating the components.
- Clean and test: Once the soldering is complete, clean the area around the USB port to remove any flux residue. Reassemble your desktop and test the repaired USB port to ensure proper functionality.
If you’re not confident in your soldering skills or if the USB port damage is extensive, it’s recommended to seek the assistance of a professional technician who specializes in motherboard repairs. They have the expertise and experience to handle complex repairs and ensure the longevity of your desktop motherboard.
Remember, proper repair techniques and careful handling are crucial to prevent further damage to your motherboard. If you’re unsure about any step in the repair process, it’s always better to consult a professional.
Fixing a loose USB port on a desktop motherboard requires precise soldering techniques and careful handling. Seeking professional assistance is a viable option to ensure the repair is done correctly and to prevent any further damage to the motherboard.
Troubleshooting HDMI Port Issues on Desktop Motherboards
If you’re experiencing issues with the HDMI port on your desktop motherboard, it can be frustrating to have no audio or video output. Don’t worry, we’ve got you covered! In this section, we’ll walk you through the troubleshooting steps to identify and resolve the problem.
Checking for Visible Damage or Loose Connections
Before diving into complex solutions, start by examining the HDMI port for any visible signs of damage or loose connections. Look for bent or broken pins, dislodged connectors, or other physical issues. If you spot any problems, gently realign the connections or consider replacing the damaged components.
If everything appears normal, ensure that the HDMI cable is properly inserted into the port. Sometimes, a loose or partially inserted cable can cause audio or video output issues. Disconnect and reconnect the cable firmly to ensure a secure connection.
Resetting UEFI/BIOS Settings
In some cases, resetting the UEFI/BIOS settings on your motherboard can help resolve HDMI port issues. To do this, follow these steps:
- Restart your computer.
- During the startup process, press the designated key to access the UEFI/BIOS settings. The specific key may vary depending on your motherboard manufacturer (common keys include Del, F2, or F10).
- Navigate to the “Reset to Defaults” or “Load Optimized Defaults” option.
- Select the option and confirm the reset.
- Save the changes and exit the UEFI/BIOS settings.
After resetting the UEFI/BIOS settings, check if the HDMI port is now working properly.
Updating UEFI/BIOS Firmware
If the HDMI port still isn’t functioning after checking for damage, loose connections, and resetting the UEFI/BIOS settings, updating the UEFI/BIOS firmware may help resolve compatibility issues. Here’s how to update the firmware:
- Visit the website of your motherboard manufacturer and locate the support or downloads section.
- Search for the latest UEFI/BIOS firmware update for your specific motherboard model.
- Download the firmware update file and save it to a USB flash drive.
- Restart your computer and enter the UEFI/BIOS settings.
- Navigate to the “Update BIOS” or “Flash BIOS” option.
- Select the option and follow the on-screen instructions to update the firmware using the USB flash drive.
- Once the update is complete, restart your computer and check if the HDMI port is now functioning.
Troubleshooting HDMI Port Issues: Conclusion
Troubleshooting HDMI port issues on your desktop motherboard doesn’t have to be overwhelming. By following the steps outlined above, you can effectively diagnose and resolve common problems, such as HDMI port not working or no audio/video output.
If you’ve tried all the troubleshooting steps and the issue persists, it may be necessary to seek professional assistance or consider replacing the HDMI port. Remember to back up your data and consult your motherboard manufacturer or a qualified technician for further guidance.
Replacing Damaged HDMI Ports on Desktop Motherboards
If your HDMI port is damaged and cannot be repaired, you may need to replace it. This process involves soldering a new HDMI port onto the motherboard, which requires advanced soldering skills and specialized tools. It is recommended to seek the assistance of a professional technician for this type of repair.
Replacing a damaged HDMI port on a desktop motherboard requires precision and expertise. Here is a step-by-step guide to help you understand the process:
-
Ensure that you have the necessary tools, including a soldering iron, flux, solder wire, desoldering pump or wick, and heat-resistant gloves.
-
Disconnect the motherboard from the power source and remove it from the computer case.
-
Locate the damaged HDMI port on the motherboard. It is usually located near the rear I/O panel.
-
Carefully desolder the damaged HDMI port by heating the solder joints with the soldering iron and using the desoldering pump or wick to remove the melted solder.
-
Clean the solder pads on the motherboard with a clean cloth or isopropyl alcohol.
-
Apply flux to the cleaned solder pads and align the new HDMI port with the solder pads.
-
Solder the new HDMI port to the motherboard by heating the solder joints and applying solder wire.
-
Allow the solder to cool and solidify before reassembling the motherboard into the computer case.
-
Test the newly replaced HDMI port by connecting a compatible device and verifying the audio and video output.
Note: Replacing a damaged HDMI port requires advanced soldering skills and should only be attempted by experienced individuals or professionals.
If you are unsure about your soldering skills or lack the necessary tools, it is strongly advised to seek professional assistance. Improper soldering or mishandling can cause further damage to the motherboard.
By following the steps above or consulting a professional, you can successfully replace a damaged HDMI port on your desktop motherboard and restore its functionality.
| Benefits of Professional Assistance | Drawbacks of DIY Replacement |
|---|---|
|
|
Conclusion
Repairing loose or damaged ports on desktop motherboards is a complex undertaking that necessitates technical prowess. While experienced individuals may be able to attempt some repairs, it is highly recommended to seek the expertise of a professional technician who specializes in motherboard repairs. Proper diagnosis and repair techniques are critical for ensuring effective port repair and preventing further damage to the motherboard.
By following the appropriate steps and seeking professional assistance when needed, you can restore the connectivity of your desktop motherboard and enjoy uninterrupted usage. Whether it’s a problematic USB port or a faulty HDMI port, addressing port issues promptly is essential for maintaining the functionality of your desktop computer.
Don’t let loose or damaged ports limit your productivity or entertainment experience. Stay connected and make the most out of your desktop motherboard by entrusting your port repair needs to a qualified professional. With their expertise, you can have peace of mind knowing that your desktop motherboard will be repaired safely and efficiently.
FAQ
How do I troubleshoot USB port issues on my desktop motherboard?
Before assuming that your USB port is faulty, test it by connecting the device to another USB port. If the device works in another port, then the issue is likely with the original port. Inspect the USB port for any physical damage or dirt buildup and clean it using compressed air or a vacuum cleaner. If the port is loose or damaged, further repairs may be necessary.
How do I repair loose USB ports on my desktop motherboard?
Repairing a loose USB port on a desktop motherboard can be a challenging task. If you’re confident in your soldering skills, you can attempt to re-solder the port to the motherboard. However, this requires careful handling and precise soldering techniques. Alternatively, you can seek the help of a professional who specializes in motherboard repairs.
How do I troubleshoot HDMI port issues on my desktop motherboard?
If your HDMI port is not working on your desktop motherboard, check for any visible signs of damage or loose connections. Also, ensure that the HDMI cable is properly inserted into the port. If there are no visible issues, try resetting the UEFI/BIOS settings on your motherboard. Updating the UEFI/BIOS firmware may also help resolve any compatibility issues.
How do I replace damaged HDMI ports on my desktop motherboard?
If your HDMI port is damaged and cannot be repaired, you may need to replace it. This process involves soldering a new HDMI port onto the motherboard, which requires advanced soldering skills and specialized tools. It is recommended to seek the assistance of a professional technician for this type of repair.