Lenovo tablet screen repairs are becoming more common. Devices often break, making this skill a money saver. By learning to repair your screen, you extend your gadget’s life. This guide will show you how to replace a tablet screen. It’s useful for both tech fans and beginners. You’ll find it an invaluable skill.
This guide covers repair steps from start to finish. We begin with why repairs are needed and the common problems. Then, we list the tools you’ll need. Follow our steps closely for a successful screen fix.
For more tips on tablet screen replacement, check out this detailed repair guide. It’s packed with extra advice to boost your skills.
Tablets, like those from Lenovo, can show varied signs of wear that call for quick action. These signs include cracks, screens that won’t respond, or display problems. Knowing these signs is key to fixing screen damage and keeping your device in top shape.
There are many reasons for tablet screen repair. A broken screen can ruin your experience and affect how the device works. If ignored, these issues can get worse, shortening the device’s life. Fixing the screen can be smarter and cheaper than getting a new one.
It’s vital to assess the damage to decide between repair or replacement. Often, repairing is enough to make your tablet work well again, and it’s much cheaper than buying a new one. Services for Lenovo tablets include many fixes, not just screens but also batteries and charging ports.
Aspect
Repair
Replacement
Cost
Generally lower, with potential savings
Higher upfront cost
Time
Often completed the same day
May take days to receive a new device
Environmental Impact
Reduces e-waste
Contributes to electronic waste
Warranty
1-year limited warranty on most repairs
New device warranty terms
Knowing about screen damage resolution helps users make smart choices for their Lenovo tablets. Fixing screens is not only more affordable but also prolongs your device’s life.
For more tips on whether your tablet needs fixing, check out this guide.
Common Issues with Lenovo Tablet Screens
Many Lenovo tablet users come across display problems that can really affect how they use their devices. It’s crucial to know these common issues. Then you can spot when you might need a fix.
Cracked screens are a typical problem, usually from dropping or hitting the device. These cracks make it hard to see the screen and can lead to more damage. You might also find dead pixels – these are tiny dots that don’t light up. They make the screen look bad and ruin your viewing fun.
Another annoying issue is screen flickering. It can be caused by software bugs or hardware issues. It messes with how well the touch screen works. Plus, sometimes parts of the touch screen won’t respond. This could happen if the device is damaged or something inside isn’t working right.
Noticing these problems early is key. It helps you figure out what to do next to fix your tablet. Here’s a clear table showing the common issues Lenovo tablet screens have:
Issue
Description
Potential Causes
Cracked Screen
Visible cracks affecting screen clarity and touch functionality.
Accidental drops or severe impacts.
Dead Pixels
Small non-functioning dots on the screen.
Manufacturing defects or physical damage.
Screen Flickering
Inconsistent display behaviour with intermittent brightness changes.
Software glitches or hardware malfunctions.
Touch Screen Issues
Areas on the screen that are unresponsive to touch.
Internal component failures or surface damage.
Essential Tools for Lenovo Tablet Screen Repair
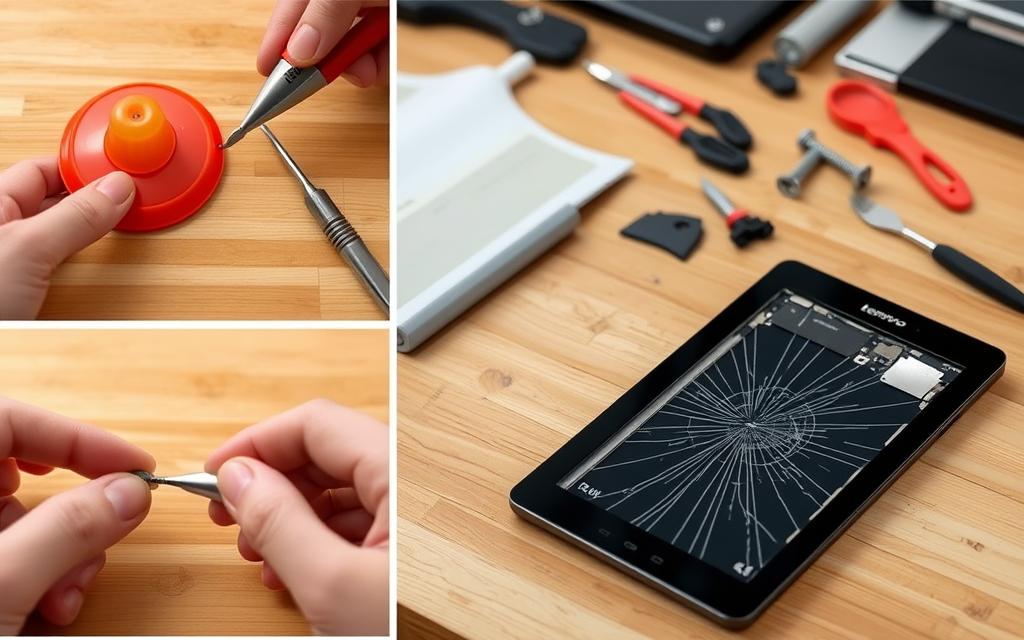
Fixing a Lenovo tablet’s screen needs care and the right tools. Knowing the needed tools makes sure the project goes well without harming the tablet further. Here is a list of must-have tools for fixing it yourself:
Tweezers – Essential for handling small components
Plastic opening tool – Prevents damage to the tablet casing
Phillips #000 screwdriver – Ideal for removable screws found in Lenovo tablets
Spudger – Assists in prying open the tablet without scratching
Heat gun or hairdryer – Useful for loosening adhesive
Screen suction cup – Helps in lifting the screen away from the body
Using the best tools can make a big difference in fixing screens. Good quality tools make the job easier and more precise. So, investing in them is smart for anyone trying to fix things themselves. The right tools help avoid extra problems and make the repair smoother.
Tool
Function
Importance
Tweezers
Handle small components
Precision and control during assembly
Plastic opening tool
Open the tablet casing
Prevents casing damage
Phillips #000 screwdriver
Remove screws
Compatibility with tablet screws
Spudger
Pry open components
Avoids surface scratches
Heat gun/hairdryer
Loosen adhesive
Facilitates easier separation
Screen suction cup
Lift the screen
Enhances grip and control
Safety Precautions Before Beginning the Repair
Starting tablet repair calls for strict safety measures. To avoid potential dangers, always switch the device off and disconnect it. Doing this greatly lowers the chances of electric shocks.
Having a tidy workspace is key. A clean area not only boosts safety but also improves access to tools. Using anti-static wristbands further protects delicate parts from static harm.
Be careful with batteries. Keep rechargeable ones at room temperature and follow safety instructions. Ignoring these steps can lead to dangerous outcomes.
Check all parts needing to be taken apart before you start. Use headphones with care to avoid loud noises during checks. These tips make DIY repairs safer and more likely to succeed.
How to Repair Lenovo Tablet Screen
Fixing a Lenovo tablet screen might seem tough, but it’s easier if you know how. First, learn the screen replacement process thoroughly. You’ll start by carefully taking apart the tablet to get to the broken screen. This step is vital to prevent any further damage.
Collect important tools like screwdrivers, plastic prying tools, and adhesive before you start. These tools are key to a smooth repair process. If doing it yourself feels too much, there’s help available. uBreakiFix by Asurion, with over 700 locations and skilled experts, can support you. They’ve done over 14 million repairs, so you’re in good hands.
Most repairs are done quickly, often on the same day. They use top-quality parts and offer a 1-year limited warranty. This guarantee covers the new screen and gives you confidence in the repair’s durability.
For DIY enthusiasts, knowing the screen replacement steps well is important. Make sure to back up your tablet data before you start. A cautious and planned approach will improve your chances of a successful fix.
Repair Feature
Details
Locations Available
Over 700
Average Repair Time
Most completed in 45 minutes or less
Warranty Offered
1-year limited warranty
Price Guarantee
Will beat any local competitor’s price by $5
Customer Feedback Rating
4.4 out of 5 stars
Repairs Completed to Date
Over 14 million
Free Diagnostics
Available before starting repairs
Parts Used
OEM parts offered on most repairs
Types of Repairs Offered
Water damage, WiFi/Bluetooth, charging port
Customer Service
Professionality and responsiveness
Step-by-Step Instructions for Screen Replacement
Replacing a screen on a Lenovo tablet needs careful focus and the right tools. We will guide you through the important tasks to make the tablet repair process easy.
Removing the Back Cover
First, remove the back cover with caution to avoid damage. Use a plastic tool to pry the cover off gently. Start at one edge and work your way around, applying even pressure.
This helps to prevent breaking the back cover while taking it off.
Disconnecting Internal Components
After removing the cover, disconnect the internal parts next. This includes taking the battery out and unplugging connectors. The battery, stuck down with adhesive, might need some effort to remove.
Use tweezers, which you can buy for about $4.99, to handle tight spots. Be careful to avoid damaging components and don’t use metal tools on connectors.
Replacing the Damaged Screen
Now it’s time to replace the screen. With internal parts disconnected, you’re left with the screen only. Gently remove the damaged screen, watching out for adhesive left behind.
Fit the new screen carefully into the frame of the device. Make sure it sits well before moving on.
Reassembling Your Lenovo Tablet
For the final step, put your device back together. Start by attaching the new screen and then connect all internal parts back. Begin with the battery, make sure it is secured, then fix other connectors.
Press the back cover back into place until it clicks. Following these steps will get your Lenovo tablet working like new again.
Testing Your Tablet Post-Repair
After you fix your Lenovo tablet, it’s important to test it to make sure it works right. Start by checking tablet functions carefully. Make sure the touchscreen responds well, the display is clear, and it runs smoothly.
If the touchscreen doesn’t work, it might be because something came loose. It’s important to check everything is connected properly. Also, look out for any dirt, dust, or scratches that could cause problems.
Functionality Check
Action Required
Potential Issues
Touchscreen Response
Swipe and tap various areas
Unresponsive zones may indicate misalignment or digitizer issues
Screen Clarity
Examine for any visual defects
Scratches or cracks can impede visibility
System Performance
Open multiple applications
Lagging may suggest RAM issues or software glitches
Physical Inspection
Check for loose connections
Loose cables may affect responsiveness
To keep your tablet working well, consider a few tips. Use a screen protector and a soft case. It’s best to avoid putting your tablet face down on rough surfaces to prevent damage.
If problems keep coming up, there are ways to figure out what’s wrong. Try freeing up RAM, restarting your tablet, or using a mouse if the screen’s hard to use. Sometimes, you might need an expert’s help for bigger issues, like fixing the screen. For any help you need, places like uBreakiFix by Asurion are ready to assist.
Conclusion
Understanding how to fix a Lenovo screen is key for anyone wanting their tablet to last longer. This guide has shown you the first signs of screen problems and how to fix them. Now, you can handle many issues on your own. This not only makes you more independent but helps keep your tablet in good shape.
Sometimes, though, it’s best to get help from experts. If the problem is big or keeps coming back, professional help is needed. This ensures that your Lenovo tablet works well for as long as possible. By being proactive and well-informed, you can take good care of your device.
The guide on fixing Lenovo screens teaches more than just repairs. It promotes a mindset of self-sufficiency with technology. Use this knowledge to protect and enhance the life and performance of your tablet.
FAQ
What are the common signs that my Lenovo tablet screen needs repair?
Look out for cracks or if the touch is not responding. Problems like flickering or dead spots on the screen are bad signs. You might also notice the touch sensitivity has gone down.
Is it more cost-effective to repair or replace my Lenovo tablet screen?
Fixing the screen can often save you money. It helps your device last longer without needing to buy a new one.
What essential tools do I need to repair my Lenovo tablet screen?
You’ll need some tweezers, a tool to open the case, and a small Phillips screwdriver. Make sure your tools are of good quality. This prevents more damage.
What safety precautions should I take before starting the repair?
Ensure the device is off and disconnected. Work in a clean space. Wearing an anti-static wristband can also protect the tablet’s parts.
Can I really replace my Lenovo tablet screen myself?
Absolutely, if you have the right tools and follow directions well, you can do it. The process isn’t too complicated with clear instructions.
How do I test my tablet after repairing the screen?
Check if the touchscreen responds as it should. Make sure the display looks clear. The tablet should work as expected.
What should I do if I encounter difficulties during the repair?
If problems arise, getting help from a professional might be best. Some issues might need more advanced tools or skills.
A stuck pixel on your tablet screen can be frustrating, impacting your viewing experience. Fortunately, there are effective methods to fix this issue and restore your tablet’s display quality. In this article, we will explore the steps you can take to fix a stuck pixel on your tablet screen, ensuring optimal performance. If you are…
Tablets are convenient devices for browsing the internet, but they can sometimes suffer from slow internet speeds. There are several factors that can contribute to this issue, such as limited storage, outdated software, specific apps, or a slow internet connection. To solve your tablet’s slow internet speeds, there are a few steps you can take,…
Is your device unresponsive when pressing the power button? This issue is common across brands like Samsung, including models such as the Galaxy Tab S7. Physical damage, software glitches, or wear over time can cause this problem. Before attempting any repair, always disconnect the power source. Safety first! Many users, as seen in Samsung Community…
Having trouble with your Samsung tablet not charging can be a real headache. It’s annoying when you can’t use it for streamed shows, browsing, or work. Knowing how to get it charging again is key to keeping it running well. There are many possible causes, like a dirty port, software glitches, or a dead battery….
If you’re struggling with the clarity of your tablet’s display and need to fix the incorrect display resolution, there are several steps you can take. These include adjusting the brightness and resolution, checking for software or hardware issues, and performing a hard reset if necessary. By following these steps, you can resolve display resolution issues…
Welcome to our comprehensive guide on upgrading the SSD in your tablet. If you’re looking to improve your tablet’s storage capacity and overall performance, this step-by-step guide is for you. We’ll walk you through the process and provide valuable tips to ensure a successful upgrade. However, please keep in mind that performing this upgrade is…