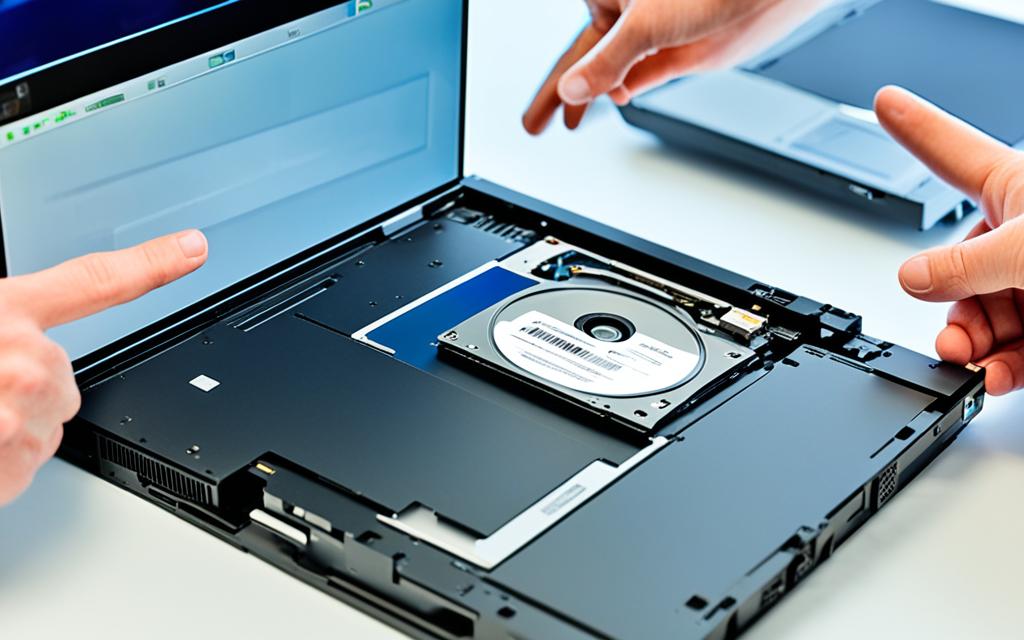
Is your laptop’s optical drive collecting dust? If you rarely use it and need some extra storage, why not consider replacing it with a solid-state drive (SSD) or a hard disk drive (HDD)? Older laptops are now designed without DVD drives to save space and enhance battery life. In this article, we will provide a step-by-step guide on how to replace your laptop’s DVD drive with a 2.5-inch SSD or HDD for more storage and improved performance.
Replacing the DVD drive with an SSD or HDD offers several advantages. Not only will you gain extra storage capacity, but you’ll also experience faster data transfer speeds and have better backup options. Additionally, you’ll make efficient use of the space occupied by the DVD drive, maximizing your laptop’s potential. Follow our guide below to give your laptop a well-deserved upgrade. A related repair case also appears in laptop s wifi adapter, where the same fault patterns can change the best fix path.
What You Need for Replacing a DVD Drive With an SSD or HDD
To replace your laptop’s DVD drive with an SSD or HDD, you will need a few essential tools and components. Let’s take a look at what you’ll need:
Drive Caddy: A drive caddy is a device that slides into the CD or DVD drive slot and holds the new HDD or SSD. This caddy will be the key component in replacing the DVD drive with the new storage device.
Screwdriver: You’ll need a screwdriver to remove the screws that secure the DVD drive in place. Ensure you have the correct size and type of screwdriver for your laptop.
Plastic Lever Tool: To safely remove the DVD drive, you’ll need a plastic lever tool. This tool helps you gently pry the drive out without damaging any other components.
Hot Glue Gun: A hot glue gun may come in handy for securing the drive caddy in place. This ensures that the new storage device remains firmly attached to the laptop’s chassis.
You can purchase a drive caddy and any necessary tools from reputable online retailers such as Amazon or eBay. These items are generally available at affordable prices, making the process of replacing your laptop’s DVD drive a cost-effective upgrade.
Did You Know? Replacing your laptop’s DVD drive with an SSD or HDD can significantly enhance your laptop’s performance, increase storage capacity, and improve data transfer speeds. This upgrade allows you to make better use of the space occupied by the DVD drive, resulting in a more efficient and versatile laptop.
Step-by-Step Guide to Replace Your Laptop’s DVD Drive
In this step-by-step guide, we will walk you through the process of replacing your laptop’s DVD drive with either an SSD or an HDD. Follow these instructions carefully to ensure a successful installation.
Tools and Components Needed
Before you begin, gather the following tools and components:
A drive caddy
A screwdriver
A plastic lever tool
A hot glue gun (optional)
The drive caddy is a crucial component that will hold the new SSD or HDD in place. You can easily purchase one online from retailers like Amazon or eBay at an affordable price.
Step 1: Prepare Your Laptop
Start by turning off your laptop and disconnecting it from any power source. Make sure to ground yourself by touching a metal surface to avoid static electricity.
Step 2: Remove the DVD Drive
Locate the DVD drive on your laptop. Use the screwdriver to remove any screws securing the drive in place. Once the screws are removed, gently slide the lever tool underneath the edge of the drive to loosen it. Carefully pull the DVD drive out of its slot.
Pro Tip: Take note of the specific screws and their locations for easy reassembly later.
Step 3: Insert the SSD or HDD
Take the new SSD or HDD and insert it into the drive caddy. Ensure that it is aligned correctly and securely fastened in place. If desired, use a hot glue gun to add additional stability.
Step 4: Install the Drive Caddy
Slide the drive caddy with the newly inserted SSD or HDD into the empty slot where the DVD drive was previously located. Apply gentle pressure to ensure a snug fit.
Step 5: Secure and Reassemble
Using the screws you removed earlier, secure the drive caddy in place. Double-check that all connections are secure and aligned properly. Finally, reassemble your laptop by reinserting any panels or covers that were removed during the process.
Pro Tip: Test your laptop to ensure that the new SSD or HDD is recognized and functioning correctly before fully reassembling it.
Step 6: Enjoy the Benefits of Your Upgrade
Congratulations! You have successfully replaced your laptop’s DVD drive with an SSD or HDD. Enjoy the increased storage capacity, improved performance, and faster data transfer speeds that this upgrade provides.
Pro Tip: Consider cloning your old hard drive onto the new SSD for a seamless transition, or perform a fresh installation of your operating system for optimal performance.
Step
Description
1
Prepare your laptop by turning it off and disconnecting it from any power source.
2
Remove the DVD drive by removing the screws and gently sliding the lever tool underneath the drive to loosen it.
3
Insert the new SSD or HDD into the drive caddy.
4
Install the drive caddy in the empty slot where the DVD drive was previously located.
5
Secure the drive caddy with screws and reassemble your laptop.
6
Test your laptop to ensure the new SSD or HDD is recognized and functioning correctly.
Reusing Your Old DVD Drive
After replacing your laptop’s DVD drive with an SSD or HDD, you may be wondering what to do with the old DVD drive. One option is to repurpose it by installing it into an external housing. This will allow you to easily connect and disconnect the DVD drive from your laptop or other devices.
All you need is a laptop DVD enclosure and a pair of USB connectors for data and power. With these materials, you can create your own DIY portable DVD drive that can be used with tablets, ultrabooks, or any other device without an optical drive.
Why Repurpose Your Laptop DVD Drive?
If you’ve invested in a high-quality DVD drive for your laptop, it’s worth finding another use for it rather than letting it go to waste. Repurposing your DVD drive extends its lifespan and allows you to continue utilizing its functionality, even after replacing it with a newer storage solution.
By repurposing your old DVD drive into an external optical drive, you can enjoy the convenience of having a portable device to read CDs and DVDs on the go. Whether you need to access software, watch movies, or burn discs, having an external optical drive provides the flexibility you need.
Creating Your DIY Portable DVD Drive
To create your own portable DVD drive, follow these steps:
Obtain a laptop DVD enclosure: This is the external housing that will hold your DVD drive.
Remove the DVD drive: Take out your old DVD drive from your laptop using the appropriate tools, such as a screwdriver and plastic lever tool.
Install the DVD drive into the enclosure: Insert your DVD drive into the laptop DVD enclosure, ensuring it fits securely.
Connect the USB cables: Attach one end of the USB connectors to the DVD drive and the other end to your computer or device.
Power on and test: Once everything is connected, power on your laptop or device and test the functionality of your DIY portable DVD drive.
With a little bit of effort and creativity, you can repurpose your laptop’s DVD drive and transform it into an external optical drive that enhances the functionality of your devices.
The Benefits of Repurposing Your DVD Drive
Repurposing your DVD drive offers several advantages beyond preserving its functionality. It allows you to save money by avoiding the need to purchase an external optical drive separately. Additionally, it reduces e-waste by extending the use of existing hardware and minimizing unnecessary disposal.
By repurposing your laptop’s DVD drive, you can continue to make the most of your investment and enjoy the convenience of having an external optical drive for various devices.
Alternatives to DVD Drive Replacement
While replacing your laptop’s DVD drive with an SSD or HDD is a popular option, there are other alternatives to consider. Some manufacturers have experimented with DVD drive-shaped USB hubs that provide additional USB ports or other features like card readers or HDMI ports. However, these devices are rare and difficult to find. The primary alternative to DVD drive replacement is using external solutions, such as USB optical drives or cloud storage, to meet your storage needs.
If you’re looking for a more versatile option, USB hubs with built-in DVD drives can be a convenient choice. These hubs not only provide extra USB ports for connecting peripherals but also allow you to play and burn DVDs without the need for an internal DVD drive.
Another alternative to consider is replacing your laptop’s CD drive with a DVD drive. This can be a cost-effective solution if you still need occasional access to DVDs or CDs and don’t want to give up your laptop’s optical drive entirely.
“Using external solutions, such as USB optical drives or cloud storage, provides flexibility and convenience, allowing you to access and store data without compromising the slim design of your laptop.”
When considering alternatives to DVD drive replacement, it’s important to evaluate your specific needs and preferences. Think about the types of media you frequently use, the amount of storage you require, and the level of convenience you desire. By weighing these factors, you can choose the best solution to optimize your laptop’s functionality and storage capabilities.
Check out the following table for a comparison of the laptop DVD drive alternatives:
Alternative
Pros
Cons
USB Hub with DVD Drive
Additional USB ports
Convenient access to DVDs
Compact and portable
Rare and difficult to find
Potential compatibility issues
Laptop CD Drive Replacement
Cost-effective
Retain optical drive functionality
Restricted to CD/DVD media
May require professional installation
USB Optical Drive
Plug-and-play functionality
No need for internal hardware modification
Requires additional device
Not integrated into laptop
Cloud Storage
Accessible from anywhere
Automatic backups
No physical media required
Dependent on internet connection
Limited by storage capacity
Conclusion
Replacing your laptop’s DVD drive with an SSD or HDD offers a range of benefits that can significantly enhance your computing experience. One of the key advantages is the increased storage capacity, allowing you to store more files, photos, videos, and games on your laptop without worrying about running out of space.
Additionally, opting for an SSD or HDD as a replacement can improve data transfer speeds, ensuring faster and more efficient access to your files. This means you can spend less time waiting for your laptop to load and more time being productive or enjoying multimedia content.
Furthermore, upgrading your laptop’s optical drive opens up the opportunity to utilize improved backup options. With the larger storage capacity provided by an SSD or HDD, you can easily create regular backups of your important data, safeguarding it against potential loss or damage.
By following the step-by-step guide provided in this article, you can effortlessly upgrade your laptop’s optical drive and take advantage of these benefits. Whether you choose to install an SSD or HDD, this simple replacement can enhance your laptop’s performance and provide a more efficient storage solution for your needs.
FAQ
Can I replace my laptop’s DVD drive with an SSD or HDD?
Yes, you can replace your laptop’s DVD drive with a 2.5-inch SSD or HDD for extra storage.
What tools and components do I need to replace my laptop’s DVD drive?
You will need a drive caddy, a screwdriver, a plastic lever tool, and possibly a hot glue gun for securing the caddy in place.
Where can I buy a drive caddy?
You can purchase a drive caddy from online retailers such as Amazon or eBay.
How do I repurpose my old DVD drive?
You can install it into an external housing to create a portable DVD drive that can be used with other devices.
Are there alternatives to replacing my laptop’s DVD drive?
Yes, you can consider using external solutions like USB optical drives or cloud storage to meet your storage needs.
What are the benefits of replacing a laptop’s DVD drive with an SSD or HDD?
Replacing your laptop’s DVD drive can provide increased storage capacity, faster data transfer speeds, and improved backup options.
Water damage can cause significant harm to laptops, whether it’s due to accidental spills, exposure to rain, or drops in water. Knowing the signs of water damage is crucial in order to take appropriate action and potentially save your laptop. Signs of water damage include leaking or dripping water from the laptop, keyboard and touchpad…
Laptop motherboards play a crucial role in the functioning of a laptop, acting as the central hub that allows all components to communicate with each other. However, motherboard issues can manifest in various ways and cause significant problems for users. Common symptoms of motherboard problems include the laptop failing to turn on, freezing or running…
Diagnosing laptop motherboard failures can be a daunting task, with motherboard problems often presenting themselves in various ways. It’s essential to troubleshoot motherboard failure accurately, as it can mimic other issues and lead to unnecessary repairs. Some common symptoms of motherboard failure include the laptop not turning on, freezing during use, running slower than usual,…
Welcome to our comprehensive guide on advanced soldering techniques for laptop component upgrades. If you’re looking to enhance your hardware skills and maximize your laptop’s performance, this article is for you. We’ll delve into the intricacies of upgrading soldered components like RAM and CPUs, overcoming limitations, and the key considerations you need to keep in…
If you’re experiencing issues with your laptop’s performance, specifically related to freezing, crashes, or errors, it could be due to a damaged RAM slot. This article will delve into the topic of RAM slot repair and provide expert advice on how to address this issue. We’ll explore common symptoms of a damaged RAM slot, potential…
Laptop processors, also known as CPUs (Central Processing Units), play a crucial role in the performance of any computer. While upgrading a CPU on a desktop is a common practice, the same cannot be said for laptops. Most modern laptops have their CPUs soldered directly onto the motherboard, making it difficult, if not impossible, to…