Are you an iPhone user who loves capturing flawless photographs? If you’ve been experiencing issues with the flash feature on your device, don’t worry – you’re not alone. Many iPhone users have reported malfunctions with the iPhone flash, which can impact the quality of your photography and device performance.
In this article, we will explore the common flash malfunctions on iPhones and provide expert tips to overcome these issues for better lighting and seamless device performance. Whether you’re struggling with flash malfunctions in portrait mode or dealing with greyed-out flashlight icons, we’ve got you covered. Let’s dive in and discover how to capture stunning photos without any hiccups.
When it comes to flawless photography, the iPhone flash plays a crucial role. But sometimes, the flash may not function as intended, resulting in frustrating malfunctions. From lighting effects not saving properly to the circle indicating flash activation not turning yellow, these issues can really impact the overall photography experience.
In the next section, we’ll focus on one of the common problems – flash malfunctions in portrait mode. We’ll discuss the specific issues users face and provide helpful tips to address them. So, stay tuned to learn how you can make the most out of your portrait photography with the iPhone flash.
iPhone Flash Malfunction in Portrait Mode
Some iPhone users have encountered flash malfunctions when using portrait mode. Specifically, the lighting effects, such as stage light mono or black and white filters, may fail to save as intended. Users have reported that the circle indicating flash activation does not turn yellow, resulting in the loss of desired lighting effects.
It is crucial for users to pay close attention to the on-screen instructions before capturing an image in portrait mode. These instructions often provide important details about positioning and activating the flash. By ensuring that the circle turns yellow before taking a photo, users can improve the chances of saving the desired lighting effects.
“I love using portrait mode for its stunning lighting effects. However, recently, every time I try to capture a photo with stage light mono, the circle indicating flash activation doesn’t turn yellow. As a result, the image loses its dramatic effect, and I’m left with a plain portrait. Is there a solution for this?” – iPhone user
Solution: Pay Attention to the Circle Indicator
The circle indicator plays a crucial role in activating the flash and saving the desired lighting effects. When using portrait mode, it is essential to wait for the circle to turn yellow before capturing the image. This indicates that the flash is activated, ensuring the preservation of the intended lighting effects.
By following this simple step, users can enhance their photography experience in portrait mode and capture photos with the desired lighting effects.
Common Lighting Effects in Portrait Mode
Portrait mode offers various lighting effects that allow users to add an artistic touch to their photos. Here are some popular lighting effects available in portrait mode:
Studio Light: Mimics the professional studio lighting.
Stage Light: Creates a dramatic look with a spotlight effect.
Stage Light Mono: Produces striking black and white portraits with a spotlight effect.
Contour Light: Accentuates facial features with subtle shadows and highlights.
Natural Light: Enhances the subject’s appearance with soft, natural lighting.
Exploring these lighting effects can add depth and creativity to portrait photography, making the most of the iPhone’s capabilities.
Lighting Effect
Description
Studio Light
Mimics professional studio lighting by brightening facial features and reducing shadows.
Stage Light
Creates a dramatic look by darkening the background and highlighting the subject with a spotlight effect.
Stage Light Mono
Produces striking black and white portraits with a spotlight effect, emphasizing the subject’s features.
Contour Light
Accentuates facial contours with careful placement of shadows and highlights.
Natural Light
Enhances the subject’s appearance by using soft, natural lighting.
iPhone Flash Greyed Out Issue
Another common issue reported by iPhone users is the flashlight icon appearing greyed out in the control center, rendering it inaccessible. This problem can occur after updating to a new iOS version or due to certain app settings. Users have suggested various solutions for resolving this issue:
Closing apps that use the camera
Quitting the camera app itself
Closing all apps and restarting the iPhone
Checking for low battery
Turning off LED flash for alerts
Restoring the iPhone with iTunes
Updating the iPhone’s software
Resetting all settings
These solutions address different possible causes of the greyed-out flashlight icon issue and can help restore the functionality of the flashlight on iPhones.
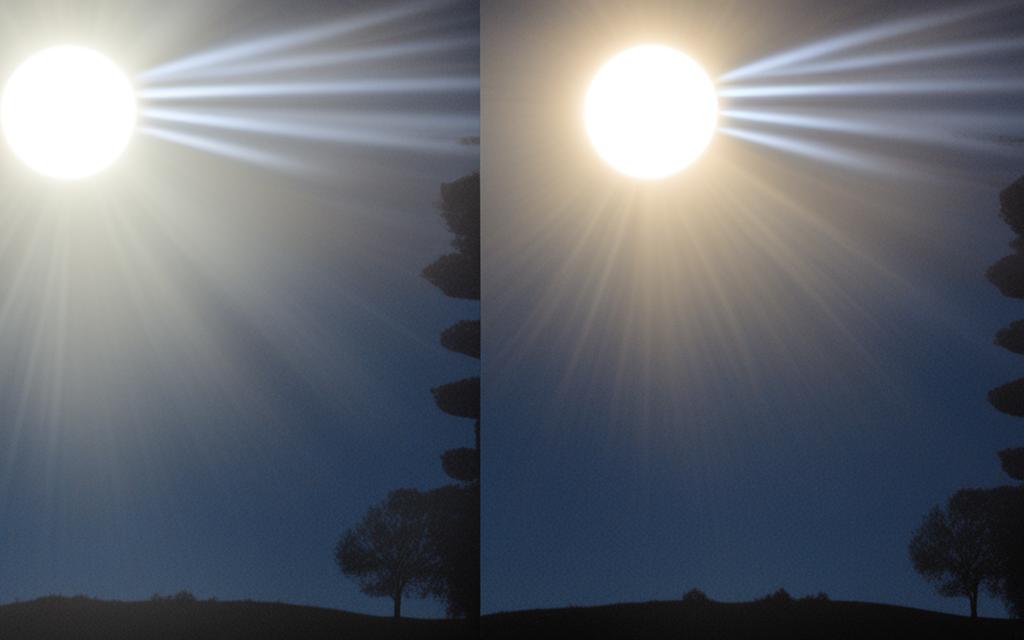
Overcoming Black Bars in Images with Off-Camera Flash
When using off-camera flash, some iPhone users have encountered the issue of black bars appearing in their images. This typically occurs when the shutter speed is set too high and exceeds the maximum flash sync speed of the camera. The flash needs the shutter curtains to be fully open in order to properly expose the entire sensor. When the shutter speed exceeds the flash sync speed, one or both of the curtains may block part of the sensor, resulting in black bars in the image.
To avoid this issue, it is recommended to keep the shutter speed at or below the maximum flash sync speed specified by the camera manufacturer. This ensures that the flash and shutter are synchronized properly, preventing any interference or obstruction that could lead to black bars in the image. By adhering to the recommended flash sync speed, you can capture photos with off-camera flash without encountering this problem.
In some cases, using high-speed sync (HSS) or FP mode can allow for faster shutter speeds while still avoiding black bars. However, it’s important to note that these modes may require compatible hardware and adjustments to compensate for the reduced flash power that occurs at higher speeds. Consulting your camera’s manual or reaching out to the manufacturer for guidance on using high-speed sync or FP mode with off-camera flash can help you achieve the desired results without compromising image quality.
Expert Tips
Check the maximum flash sync speed specified by your camera manufacturer and ensure that your shutter speed is set accordingly.
Experiment with different shutter speeds and flash settings to find the optimal combination that avoids black bars while still achieving the desired lighting and exposure.
If using high-speed sync or FP mode, be aware of the potential limitations in flash power and make any necessary adjustments to maintain proper exposure.
Consider using a tripod or stabilizing your camera to minimize camera shake, especially when shooting with slower shutter speeds to avoid black bars.
When using off-camera flash on your iPhone, it’s crucial to find the right balance between shutter speed, flash sync speed, and flash power to achieve flawless results. By understanding the relationship between these elements and following expert tips, you can overcome the issue of black bars in your images and capture stunning photos with off-camera flash.
Conclusion
iPhone flash malfunctions can be frustrating for users who rely on their devices for photography. By understanding the common issues and implementing expert tips, users can overcome these malfunctions and achieve better lighting in their photos.
When it comes to addressing flash malfunctions in portrait mode, it’s important to ensure that the circle indicating flash activation turns yellow before capturing the photo. This simple step can save the desired lighting effects and result in flawless photography.
Additionally, for users experiencing the issue of greyed-out flashlight icons in the control center, there are various solutions to try. From closing apps that use the camera to updating the iPhone’s software, taking these steps can help restore the functionality of the flashlight and ensure seamless device performance.
Finally, understanding the relationship between shutter speed and off-camera flash can help users avoid black bars in their images. By keeping the shutter speed at or below the maximum flash sync speed and making adjustments if necessary, iPhone users can enjoy seamless device performance and capture stunning photos without any unwanted distractions.
FAQ
Are there any common flash malfunctions on iPhones?
Yes, some iPhone users have reported issues with the flash feature on their devices.
What malfunctions occur in portrait mode?
When using portrait mode, certain lighting effects may not save as intended, and the circle indicating flash activation may not turn yellow.
How can I fix the greyed-out flashlight icon issue?
You can try various solutions such as closing apps that use the camera, quitting the camera app itself, restarting the iPhone, checking for low battery, and updating the iPhone’s software.
Why do black bars appear in images when using off-camera flash?
Black bars can appear when the shutter speed exceeds the maximum flash sync speed, blocking part of the sensor. It is recommended to keep the shutter speed at or below the maximum flash sync speed.
How can I overcome these flash malfunctions?
By following expert tips and implementing the recommended solutions, you can troubleshoot and resolve flash malfunctions, achieving better lighting in your photos and seamless device performance.
Many users of the iPhone 6s Plus have reported experiencing vibration motor problems, such as loud buzzing sounds or lack of vibration feedback. These…
If you’re experiencing microphone issues with your iPhone X, you’re not alone. Many UK users have reported clarity problems and are searching for solutions….


")