Step-by-Step Guide to Samsung Galaxy S21 Ultra Screen Replacement
Welcome to our comprehensive guide on replacing the screen of your Samsung Galaxy S21 Ultra. If you’ve encountered a cracked or damaged screen, fret not! With our step-by-step instructions, you’ll be able to successfully replace the screen and restore your device to its original state.
Before we dive into the process, it’s essential to understand that screen replacement for the Samsung Galaxy S21 Ultra requires careful handling and attention to detail. Following our guide will ensure a smooth and seamless replacement process, minimizing the risk of any further damage to your device.
Keep in mind that replacing the screen requires specific tools, such as an iOpener or a heat source, opening picks, a suction handle, and more. It’s crucial to gather all the necessary materials before you begin.
Let’s get started with the first step: powering off your phone and preparing the adhesive to loosen the back cover. Remember to unplug your device before proceeding.
Using an iOpener or a heat source, carefully warm up the back cover to loosen the adhesive. This will make it easier to remove the cover and access the screen.
Next, create a gap between the back cover and the frame using a suction handle. Take your time and apply gentle but firm pressure to create the gap.
Related:


Once you’ve created a gap, utilize opening picks to slice the adhesive around the edges of the phone. This step is crucial and should be done carefully to avoid any damage to the device.
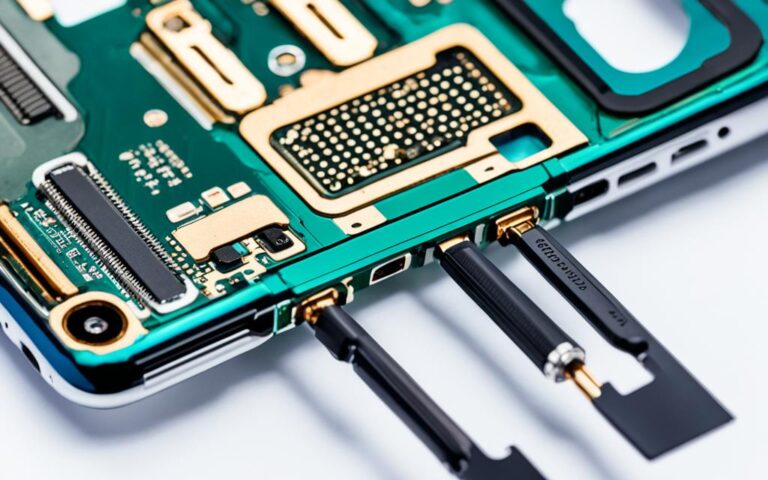
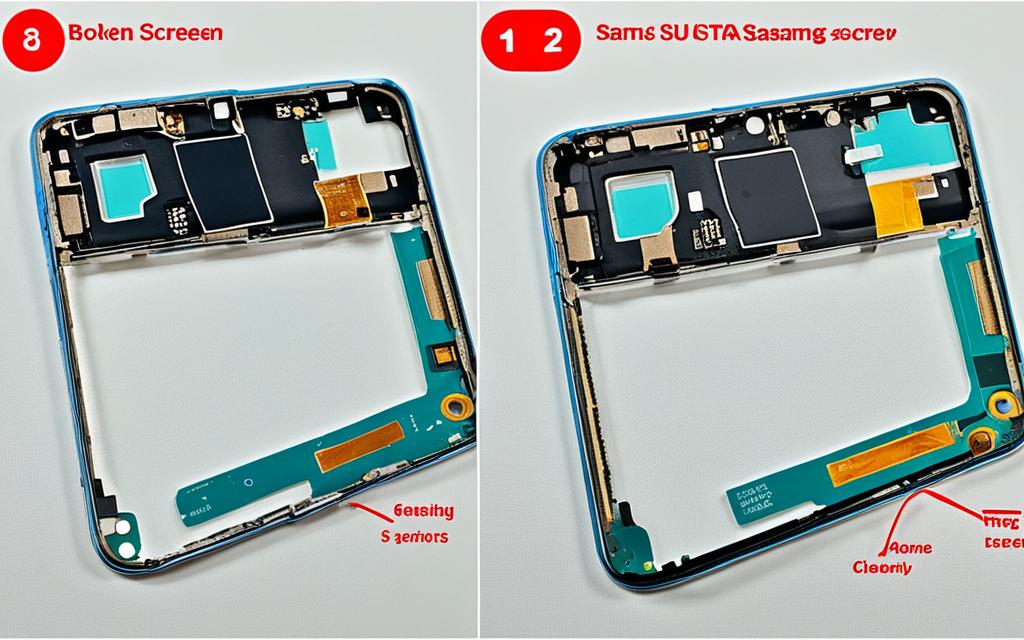
With the back cover successfully removed, you can now proceed to disconnect and remove various components of your Samsung Galaxy S21 Ultra. These components include the NFC antenna, charging coil, loudspeaker assembly, and more.
Remember to take note of each component’s placement and connection points as you remove them. This will ensure a smooth reassembly process later on.
Lastly, you’ll need to detach the motherboard, remove the old screen, and install the new one. These steps require precision and attention to detail. Take your time and follow each instruction carefully to avoid any mishaps or damage to your device.
By the end of this guide, you’ll have successfully replaced the screen of your Samsung Galaxy S21 Ultra. With your device fully functional again, you can enjoy a flawless screen and a seamless user experience.
Remember, if you’re unsure about any of the steps or encounter any difficulties along the way, it’s always best to seek professional assistance or consult the official Samsung repair guide.
Now that you’re equipped with all the necessary information, let’s proceed to the next section and prepare for the screen replacement process.
Preparing for the Screen Replacement
Before you embark on the screen replacement process for your Samsung Galaxy S21 Ultra, it is crucial to gather all the necessary tools and materials. The following steps will guide you in preparing for a smooth screen replacement:
- Ensure you have an iOpener or a heat source, opening picks, a suction handle, tweezers, isopropyl alcohol, adhesive, and a screwdriver.
- Power off your phone and unplug it before starting the screen replacement process.
- Set up a clean and organized workspace to prevent misplacing any screws or components during the process.
- Test all the functions of your phone before sealing it up after the replacement to ensure everything is in proper working order.
By following these steps, you will be well-prepared to proceed with the Samsung Galaxy S21 Ultra screen replacement process.
Removing the Old Screen
To successfully remove the old screen of your Samsung Galaxy S21 Ultra, it’s important to follow a specific set of steps. By carefully executing each stage, you can ensure a smooth and effective screen replacement process.
Start by heating up the back cover. This can be achieved using either an iOpener or a heat source. Apply the heat evenly across the back cover to loosen the adhesive.
Next, utilize a suction handle to lift up the back cover. This tool provides a secure grip that allows you to create a gap between the back cover and the frame. To facilitate this further, use opening picks to gradually separate the back cover from the frame. This will help in detaching the back cover completely.
Once the back cover is detached, focus on slicing the adhesive around the edges of the phone. This step enables the removal of the back cover, providing access to the internal components. It’s essential to proceed with caution to avoid any damage during this process.
After detaching the back cover, you can proceed to disconnect and remove various components such as the NFC antenna, charging coil, loudspeaker assembly, and more. Each component should be carefully detached to prevent any mishaps.
Following the removal of these components, the next step involves unscrewing the motherboard. Take your time, ensuring all screws are adequately removed to prevent any damage to the device. Once unscrewed, detach the motherboard carefully.
Finally, the last stage in removing the old screen is heating it up and lifting it away from the assembly. Utilize the suction handle and opening picks to achieve this. By heating the screen, you’ll loosen any remaining adhesive, allowing for an easier removal.
Remember to exercise caution throughout the entire process to safeguard the integrity of your device.
| Steps | Description |
|---|---|
| Step 1 | Heat up the back cover using an iOpener or a heat source |
| Step 2 | Lift up the back cover using a suction handle and create a gap between the back cover and the frame using opening picks |
| Step 3 | Slice the adhesive around the edges of the phone to detach the back cover |
| Step 4 | Disconnect and remove various components such as the NFC antenna, charging coil, loudspeaker assembly, and more |
| Step 5 | Unscrew the motherboard and carefully detach it from the device |
| Step 6 | Heat up the old screen and lift it away from the assembly using a suction handle and opening picks |
Removing the old screen requires precision and attention to detail. Follow these steps diligently, and you’ll be one step closer to successfully replacing the screen of your Samsung Galaxy S21 Ultra.
Installing the New Screen
Now that the old screen has been removed, it’s time to install the new screen on your Samsung Galaxy S21 Ultra. Follow these simple steps:
- Prepare the new screen by applying any necessary adhesive.
- Insert the screen cable connector and attach the connecting cables.
- Insert the speaker and carefully screw it tight into place.
- Reattach the motherboard and ensure it is securely screwed in.
- Connect the earpiece and charging coil, securing them firmly.
- Insert the SIM tray and USB board, and secure them in place with screws.
- Finally, test your phone to ensure that the new screen is working properly.
By following these steps, you can successfully install a new screen on your Samsung Galaxy S21 Ultra, restoring its functionality and visual appeal.
Remember to take your time and be gentle when handling the delicate components. If you encounter any difficulties, consult the official Samsung repair guide or seek professional assistance to ensure a seamless screen replacement.
Conclusion
Replacing the screen of your Samsung Galaxy S21 Ultra can be a complex process, but by following this step-by-step guide, you can successfully replace the screen and restore your device to its full functionality. It’s crucial to take your time and adhere to each step carefully to avoid any damage to your phone.
If you find yourself unsure about any of the steps, it’s recommended to seek professional help or consult the official Samsung repair guide. With the right tools and instructions, you can effortlessly replace the screen of your Samsung Galaxy S21 Ultra and enjoy a flawless fix.
Restoring a cracked or damaged screen not only improves the overall aesthetics of your phone but also enhances its usability. Whether you accidentally dropped your device or encountered an unfortunate mishap, the screen replacement process allows you to regain control over your Samsung Galaxy S21 Ultra and continue enjoying its advanced features.
In conclusion, by following the detailed steps provided in this guide, you can confidently tackle the screen replacement for your Samsung Galaxy S21 Ultra. Take the necessary precautions, gather the essential tools, and proceed with patience. Before you know it, you’ll have a fully functional and visually appealing phone once again.