Welcome to our guide on reconnecting the battery connectors in the Samsung Galaxy S21 Ultra. If you’re experiencing issues with your phone’s battery connection, this step-by-step tutorial will help you fix the problem and get your device back up and running.
Before we begin, please note that this guide involves delicate procedures, and it is recommended to follow each step carefully to avoid any damage to your device. Ensure you have the necessary tools, such as a hair dryer, suction cup, opening picks, and a spudger, before you start.
To get started, make sure your Samsung Galaxy S21 Ultra is completely powered off. Then, heat the bottom edge of the back cover for two minutes using an iOpener or a hair dryer. Be cautious not to overheat the phone. This process will help soften the adhesive holding the back cover in place.
Once heated, apply a suction cup to the bottom edge of the phone and pull up with steady force to create a gap between the back cover and the frame. Insert an opening pick into the gap and slide it back and forth along the bottom edge to cut through the adhesive. Repeat these steps for the left and right edges of the back cover.
Apply heat to the left and right edges before using a suction cup and opening pick to create gaps and cut through the adhesive. Afterward, rotate the opening pick around the corners, being careful not to insert it too far. Finally, use the opening pick to cut through the adhesive around the camera shell and remove the back cover.
Now that you’ve successfully removed the back cover, you can proceed with reconnecting the battery connectors. Stay tuned for the next section of our guide, where we’ll walk you through the process step by step.
Removing the Battery Connector
Once the back cover of your Samsung Galaxy S21 Ultra is removed, you can move on to removing the battery connector. This step is crucial for conducting any repairs or maintenance that may be required.
Follow these steps to safely remove the battery connector:
Use a spudger to pry up the battery press connector while holding the motherboard bracket out of the way.
Take care to pry only under the edge of the connector to avoid damaging it or the surrounding components.
Once the battery connector has been successfully removed, you can proceed with the necessary repairs or maintenance.
When re-attaching the battery connector, it’s important to do so with caution and precision. Follow these steps to properly re-attach the battery connector:
Carefully align the battery connector with the corresponding socket on the motherboard.
Press down on one side of the connector until it clicks into place.
Repeat this process on the other side of the connector.
Avoid pressing down on the middle of the connector to prevent any potential damage to the pins.
By following these steps, you can remove and re-attach the battery connector of your Samsung Galaxy S21 Ultra safely and effectively, ensuring optimal functionality of your device.
Disconnecting the Charging Coil
After successfully disconnecting the battery connector, the next step is to disconnect the charging coil in your Samsung Galaxy S21 Ultra. This process requires delicacy to avoid any damage to the connector or surrounding components.
Here are the steps to disconnect the charging coil:
Use a spudger to gently lift the press connector of the wireless charging coil from under the motherboard.
Take care not to apply excessive force while lifting to avoid damaging the connector or nearby components.
Disconnecting the charging coil is an essential step in disassembling your Samsung Galaxy S21 Ultra. Follow the instructions carefully to ensure a smooth and successful repair process.
“Disconnecting the charging coil is crucial to access various internal components of the Samsung Galaxy S21 Ultra. Take your time and handle the delicate charging coil connector with care.”
Comparison: Disconnecting the Charging Coil
Method
Advantages
Disadvantages
Using a spudger
– Provides precise control over the disconnection process – Minimizes the risk of damaging the connector
– Requires caution and patience
Alternative methods
– None available
– May cause damage to the connector or surrounding components
As seen in the comparison table, using a spudger to disconnect the charging coil offers the most advantages, such as precise control and minimizing the risk of damage. Alternative methods should be avoided, as they can potentially cause harm to the connector or other crucial components.
Removing the Speaker and Connecting Cables
When it comes to repairing your Samsung Galaxy S21 Ultra, it may become necessary to remove the speaker and disconnect the connecting cables. This section will guide you through the process, step by step.
To begin, you’ll need the following tools:
Spudger
Screwdriver
Once you have your tools ready, follow these instructions:
Step 1: Unscrew and Pry
Start by unscrewing the six screws that secure the speaker to the frame of the device. Set the screws aside in a safe place.
Next, use the spudger tool to gently pry up the speaker. Be careful not to apply too much pressure to avoid damaging the device. Release the clips holding the speaker in place.
Step 2: Disconnect the Connecting Cables
After removing the speaker, you’ll need to disconnect the primary and secondary interconnect cables. Use the spudger tool to carefully disconnect the press connectors of the cables. Take extra care not to bend the connectors or damage the socket during this process.
Once the cables are disconnected, you can safely remove both the speaker and the connecting cables from the device.
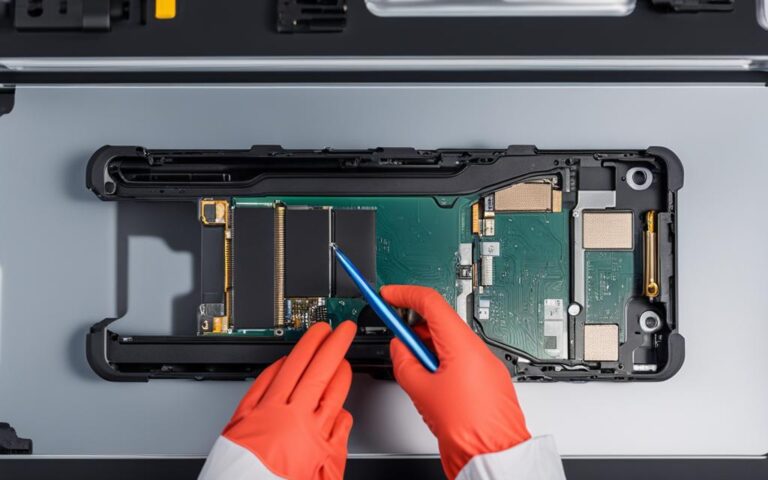
This image illustrates the process of removing the speaker in a Samsung Galaxy S21 Ultra.
Summary
Removing the speaker and disconnecting the connecting cables in your Samsung Galaxy S21 Ultra requires careful precision and attention to detail. By following these steps, you can safely carry out this repair task and make way for further repairs or replacements as necessary.
Table
Suggested Tools
Quantity
Spudger
1
Screwdriver
1
Taking Out the Battery
To remove the battery from your Samsung Galaxy S21 Ultra, follow these steps:
Apply a few drops of high concentration isopropyl alcohol to the gaps surrounding the battery’s perimeter. This will help loosen any adhesive that may be holding the battery in place.
Next, use a suction cup to create a strong grip on the battery. Place the suction cup on the center of the battery, making sure it is securely attached.
Using an opening pick, carefully insert it into the gap between the battery and the frame. Gently pry and lift the battery, making sure not to puncture or bend it.
If needed, you can apply more isopropyl alcohol to further ease the process of separating the battery from the frame.
Once the battery is lifted and separated, continue to carefully remove it from the device. Make sure to check for any remaining adhesive or residue and clean it off.
Take caution throughout the process to avoid damaging the battery or any other components of your Samsung Galaxy S21 Ultra.
Removing the battery requires precision and care. If you are unsure or uncomfortable performing this task yourself, it is recommended to seek professional assistance.
Why Removing the Battery is Important
Removing the battery is essential in various situations, such as performing repairs or replacing a faulty battery. It allows access to other internal components and ensures safe handling during maintenance procedures.
Benefits of Removing the Battery
Benefits
Explanation
Repairability
Removing the battery enables easier access to other internal components, facilitating repairs and replacements.
Safety
Removing the battery ensures safe handling during maintenance procedures, reducing the risk of damage or injury.
Performance
Replacing a faulty battery with a new one can help improve the overall performance and battery life of your Samsung Galaxy S21 Ultra.
Conclusion
Congratulations on successfully fixing the battery connector in your Samsung Galaxy S21 Ultra! Now it’s time to reassemble your device and ensure everything is working perfectly.
Begin by following the above steps in reverse order, carefully reconnecting all the components and cables. Take your time to align and press down the battery connector, making sure it clicks into place securely.
Once you’ve reassembled the device, it’s essential to test all functions to ensure they are working correctly. Check the display, camera, speakers, and all other features to ensure everything is functioning as expected.
If needed, reapply adhesive or use pre-cut adhesive to secure the battery and back cover firmly. This will ensure a tight and secure fit, providing long-lasting performance.
Lastly, remember to dispose of any e-waste responsibly. Electronic devices contain valuable materials and harmful substances, so it’s important to recycle them properly to protect the environment.
FAQ
How do I reconnect the battery connectors in my Samsung Galaxy S21 Ultra?
To reconnect the battery connectors in your Samsung Galaxy S21 Ultra, power off your phone completely. Then, heat the back cover’s bottom edge for two minutes using an iOpener or a hair dryer. Be cautious not to overheat the phone. Apply a suction cup to the bottom edge and pull up with steady force to create a gap between the back cover and the frame. Insert an opening pick into the gap and slide it back and forth along the bottom edge to cut through the adhesive. Repeat these steps for the left and right edges of the back cover. Apply heat to the left and right edges before using a suction cup and opening pick to create gaps and cut through the adhesive. Afterward, rotate the opening pick around the corners, being careful not to insert it too far. Finally, use the opening pick to cut through the adhesive around the camera shell and remove the back cover.
How do I remove the battery connector?
To remove the battery connector, use a spudger to pry up the battery press connector while holding the motherboard bracket out of the way. Take care to pry only under the edge of the connector to avoid damaging it or the surrounding components.
How do I re-attach the battery connector?
To re-attach the battery connector, carefully align and press down on one side until it clicks into place, then repeat on the other side. Avoid pressing down on the middle to prevent bending the pins and causing damage.
How do I disconnect the charging coil?
To disconnect the charging coil, use a spudger to gently lift the press connector of the wireless charging coil from under the motherboard. Take care not to apply too much force and damage the connector or surrounding components.
How do I remove the speaker and connecting cables?
To remove the speaker, unscrew the six screws securing it to the frame and use a spudger to pry it up and release the clips holding it in place. Then, use a spudger to disconnect the press connectors of the primary and secondary interconnect cables. Take care not to bend the connectors or damage the socket. Remove the speaker and the connecting cables from the device.
How do I take out the battery?
To remove the battery, apply a few drops of high concentration isopropyl alcohol to the gaps surrounding the battery’s perimeter. Use a suction cup and an opening pick to lift and separate the battery from the frame. If needed, apply more isopropyl alcohol to ease the process. Take care not to puncture or bend the battery. Remove the battery and any remaining adhesive or residue.
Welcome to our guide on Samsung Galaxy Note 10+ cooling system repair! In this article, we will discuss how to maintain the high-performance functionality…
The Samsung Galaxy S21 is known for its exceptional front camera, allowing users to capture stunning selfies. To ensure that your selfies are flawless…
The Samsung Galaxy S10+ is a popular smartphone that offers a range of innovative features and functionalities. However, like all electronic devices, it emits…